Data replication
Tables
Learn how to replicate, configure, and manage tables in Artie.
Replicating tables
Once you create a pipeline, you select which tables to replicate from your source database. Artie handles the rest: an initial snapshot (backfill) of existing data, then continuous CDC streaming to keep your destination in sync.
To manage tables, open your pipeline, click Edit pipeline, and go to the Tables tab. Each table’s Status is Streaming, Delivery paused, or Stopped. Change it from the table’s row:
- Stream reads from the source and writes to the destination.
- Pause delivery keeps reading from the source but holds the table’s changes for up to 14 days before writing them.
- Stop stops reading from the source and writing to the destination.
To change several tables at once, select them and use Edit selected tables.
Automatically capture newly created tables
In your pipeline’s destination Advanced settings, enable Auto-replicate new tables. By default, Artie checks for new source tables every weekday at 6 AM Pacific Time. Company admins can change the days, start time, and timezone under Table change handling in Company settings. You can also run the check from the pipeline overview.
A table is new if it appears after Artie’s first check of that source database. The first check only records the tables that already exist, so existing tables you didn’t select are never auto-added.
New tables are validated before Artie adds them. Valid tables are added to the pipeline and deployed automatically; tables that cannot be validated are not added. Artie emails the configured recipients with the outcome.
Use Filter new tables to choose which new tables are auto-added. The regex matches full source table names in schema.table form:
- Skip matches: matching tables are not auto-added. For example,
^public\.tmp_.*skipspublic.tmp_orders. - Only matches: only matching tables are auto-added. For example,
^public\..*auto-adds new tables in thepublicschema and nothing else.
Advanced settings
General
Tables whose full name (schema.table) matches this regex will not be auto-added.
New tables found
- public.invoicesAdded
- public.tmp_ordersSkipped
- billing.refundsAdded
- audit.loginsAdded
Additional data
In your pipeline’s destination Advanced settings, enable Add ‘Artie operation’ column to add __artie_operation to a normal destination table. It records the operation that most recently produced each row:
| Value | Operation |
|---|---|
r | Backfill |
c | Create |
u | Update |
d | Delete |
See System columns for how this column behaves in normal and history modes.
History mode
History mode provides a complete audit trail of all changes to your data. When enabled, Artie creates a separate table named {TABLE}__HISTORY that records every insert, update, and delete made to the original table.
The history table includes these additional columns:
| Column | Description |
|---|---|
__artie_operation | The operation that produced the history record (r, c, u, or d) |
__artie_updated_at | When Artie processed the change |
__artie_db_updated_at | When the change occurred in your source database |
What do people use history tables for?
- Tracking data changes over time
- Auditing and compliance
- Data recovery and point-in-time analysis
How do I enable history mode?
- Edit your pipeline
- Go into the
Tablestab - Find the table you want to enable history mode for and toggle the switch to enabled
- To enable history mode for multiple tables at once, select them using the checkboxes on the left side of the list
Automatically enable history mode for new tables
In the same Advanced settings, enable Auto-enable history mode for new tables. New tables are discovered on the same schedule as auto-replication.
- With Auto-replicate new tables also enabled, Artie adds regular replication and a
{TABLE}__HISTORYtable. - With only Auto-enable history mode for new tables enabled, Artie adds the table in history-only mode.
For automatically added history tables, Artie schedules a history-table backfill so the history table gets a baseline before continuing with CDC changes. This differs from enabling history mode later for an existing table, which captures only future CDC changes unless you explicitly run a history-table backfill.
Use While history mode is on, also filter to narrow which new tables are auto-added while this setting is on. It works like Filter new tables, with Skip matches or Only matches on full schema.table names, such as ^audit\..*. If both filters are set, a table must pass both to be auto-added.
Schema evolution
Artie supports schema evolution out of the box. It creates destination tables, detects and adds new columns, and can drop deleted columns after a safety verification period.
For a full explanation of how schema evolution works, including column exclusion/inclusion and hard deletes for columns, see the Schema evolution guide.
Destination table naming
When syncing tables from a source that supports multiple schemas into a single destination schema, Artie automatically prefixes the destination table name with the source schema name, but only when the source schema is not the default schema for that connector.
| Source | Default schema (no prefix) | Non-default schema (prefixed) |
|---|---|---|
| PostgreSQL / CockroachDB | public | any other schema |
| SQL Server | dbo | any other schema |
For example, if you replicate both dbo.actions and accounting.actions from SQL Server into a single Snowflake schema, they arrive as:
dbo.actions→actions(no prefix,dbois the default schema)accounting.actions→accounting_actions
Tables with the same name in different source schemas will always land as distinct tables in the destination, without any configuration needed.
Keep each source schema as its own destination schema
To send each table to a destination schema with the same name as its source schema, choose Write to multiple schemas on your pipeline’s Destination tab. You can add a prefix to each schema name.
With that option enabled, the same SQL Server example would produce:
dbo.actions→ destination schemadbo, tableactionsaccounting.actions→ destination schemaaccounting, tableactions
This is available when your source has schemas, on Snowflake, Databricks, Iceberg (Write to multiple namespaces), Redshift, SQL Server, MySQL, Oracle, PostgreSQL, and MotherDuck.
Table settings
To open a table’s settings, open your pipeline, click Edit, go to Tables, and click the Advanced settings gear icon on the table’s row.
General
Use different name in destination
This setting allows you to define a new table alias. If your source table is named foo, you can name it bar.
Advanced settings: comments table
Changes apply after you save and deploy the pipeline.
General
public.comments→comments_v2
If your source type supports multiple schemas (e.g. PostgreSQL, SQL Server) and you’re syncing all tables into one schema in the destination, tables that aren’t in the source’s default schema will still be prefixed with their source schema name in front of the alias you specify. This prevents accidental table name collisions in the destination.
For example, in a PostgreSQL → Snowflake pipeline, if you have source tables public.foo and schema2.foo, they would show up in Snowflake as foo and schema2_foo respectively. If you specify a destination table name of bar for the latter, it will be schema2_bar in Snowflake.
Skip deletes
When enabled, Artie will skip processing deletes. This setting is useful if you want to keep a smaller dataset in your source and have a complete archive in your destination.
Override primary keys
Use this setting when a source table does not have a primary key but has an existing unique index that can identify each row. Enable Override primary keys and select the column or columns in that unique index.
For PostgreSQL sources, set the table’s replica identity to FULL before enabling the override:
ALTER TABLE public.orders REPLICA IDENTITY FULL;Artie uses the selected columns as the merge key in the destination. They must uniquely identify each row and remain included in replication. See Replicate PostgreSQL tables without primary keys for the full setup procedure.
Column configuration
Flatten nested documents
Enable Flatten nested documents in a table’s advanced settings to write nested object fields as destination columns. This works for every source: Artie flattens structured object values emitted by the source and joins each field path with double underscores (__).
For example, this source record:
{
  "id": "order_8462",
  "customer": {
    "name": "Avery Chen",
    "address": {
      "city": "San Francisco",
      "country": "US"
    }
  },
  "items": ["starter", "support"]
}
Produces these destination fields:
{
  "id": "order_8462",
  "customer__name": "Avery Chen",
  "customer__address__city": "San Francisco",
  "customer__address__country": "US",
  "items": ["starter", "support"]
}
Artie flattens structured objects only. It does not parse JSON stored in a string, and arrays remain a single value. Use the maximum depth setting to limit nested-map traversal. Leaving it at 0 has no depth limit, and the remaining nested value is retained at the configured depth.
Flattening runs before column inclusion, exclusion, trimming, hashing, and encryption, so those column settings use the flattened names. It applies to initial backfills and ongoing changes. Enabling it changes the destination schema for that table, so review the resulting columns before enabling it for a table that already has data.
Exclude certain columns
Replicate all columns except the ones you specify. This is useful for excluding sensitive data (e.g. PII, passwords), preventing unnecessary columns from being synced, or managing storage costs by skipping large or unused columns.
For more details, see our Column inclusion and exclusion guide.
Include certain columns
Replicate only the columns you explicitly list. This gives you complete control over your destination schema and helps maintain a clean, minimal dataset.
For more details, see our Column inclusion and exclusion guide.
Hash certain columns
Hashes the values of specified columns before writing them to the destination. By default, Artie uses SHA-256. To salt the hashes, create a salt under Settings > Encryption & hashing, then pick it as the pipeline’s Column hashing salt on the Destination tab. Artie then uses HMAC-SHA256 keyed on that salt.
The same value and salt always produce the same hash, so you can join, group, and deduplicate on hashed columns across tables hashed with the same salt. A different salt produces different hashes, so if you change a pipeline’s salt, new hashes won’t match the ones already in your destination.
This is useful when you need to retain referential integrity across tables without exposing the underlying data (e.g. hashing email addresses or user IDs for analytics).
Encrypt certain columns
Encrypts the values of specified columns before writing them to the destination. Unlike hashing, encryption is reversible: you can decrypt the values later using the corresponding key.
Artie supports two key management options:
- Auto-generated key -- Artie generates and manages the encryption key for you.
- KMS with Data Encryption Key (DEK) -- Bring your own key by providing a KMS-managed DEK. This gives you full control over key rotation and access policies.
Trim spaces from certain columns
For PostgreSQL, MySQL, PlanetScale, Microsoft SQL Server, Oracle, and CockroachDB sources, select string columns whose leading and trailing whitespace should be removed before Artie writes them to the destination. Interior whitespace is preserved.
Trimming is applied to new streaming and backfill records only. It does not update rows already written to your destination. If a selected column is also hashed or encrypted, Artie trims it before applying that transformation.
Primary keys, primary-key overrides, and excluded columns cannot be selected for trimming. Do not use this setting for values where boundary whitespace is meaningful.
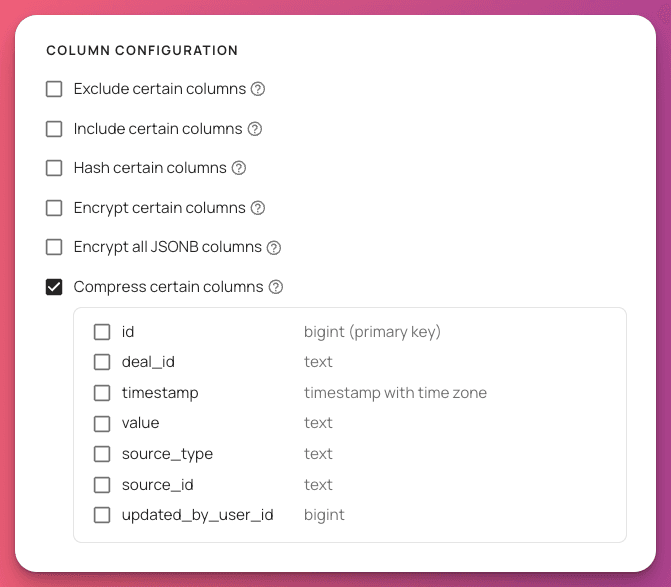
Compress certain columns
For PostgreSQL sources, compresses the values of specified columns. Contact us to turn it on. Artie compresses the column values in-flight, which allows large values to bypass Kafka’s maximum message size limit. The values are decompressed before writing to the destination, so the data arrives unchanged. This does not affect the column’s schema, data type, or stored values.
This is useful for large text or JSON columns that would otherwise exceed Kafka’s message size threshold.
Optimizations
Enable multi-step merge
For tables with very high write throughput on Snowflake, MotherDuck, or Iceberg, multi-step merge loads several flushes into a staging table, then merges that staging table into the target table. This enables Artie to handle extremely large flush batches (1 GB+) without hitting destination timeouts or resource limits.
See Multi-step merge for a deeper look at how this works. For guidance on configuring flush rules alongside this setting, see Tuning flush rules.
Use a merge predicate
Artie merges data into your destination based on your source table’s primary key(s). If your destination table has an additional clustering or partitioning key, you can specify that column here so Artie includes it in merge predicates. This allows the destination to prune data during merges, reducing latency and cost.
If your Snowflake table has a cluster key, specify the clustered column. For example, if the table was clustered by created_at:
ALTER TABLE foo CLUSTER BY (TO_DATE(created_at))Specify the partition column (e.g. created_at) so Artie can prune partitions during merges.
For a date or timestamp column, also pick a Partition granularity: Hourly, Daily, Monthly or Yearly. It defaults to Daily, and Hourly is only offered for timestamp columns.
- New tables - If you select a date or timestamp column before the table’s first sync, Artie creates the table partitioned on that column at the granularity you picked.
- Existing tables - The table must already be partitioned on the column you select. Set the granularity to match the table’s partitioning.
See Enable BigQuery partitioning for a step-by-step guide on setting up partitioned tables.
Parallelize backfill using CTID
For PostgreSQL sources, this setting uses CTID-based scanning to parallelize backfills by physical row location. This is particularly effective for large, append-only tables where rows are rarely updated or deleted.
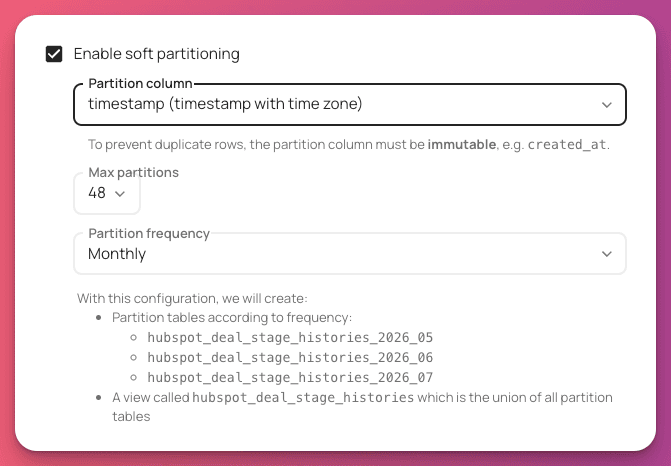
Enable soft partitioning
Splits your data into time-based partition tables while maintaining a unified view. Ideal for high-volume, time-series data where native database partitioning may not be optimal.
Artie automatically creates monthly or daily partition tables (e.g., table_2025_08 or table_2025_08_22) and routes data based on a timestamp column. A unified view stitches all partitions together.
See the soft partitioning guide.
Run this table on its own deployment
For a table with very high throughput (1M+ changes per hour) that’s much busier than your other tables, run it on its own deployment with its own flush rules: Time elapsed (seconds), Batch size (KB), and Changed records. This isn’t available for DynamoDB sources or Kafka destinations. Contact us if you don’t see this option.